Cloud keeps moving around today, seeing 5/10, transparency 4/10.
Don't really have time to fine tune to focus or the T-max.
0706 (UT), with reducer:
0710 (UT), with 2x barlows:-
0711 (UT), with 2x barlows, that interesting filaments attracted my eyes:-
The last image really shows how poor is the T-max, very uneven bandwidth across this little frame.
Welcome to my astronomy blog. I dedicate myself to the simplest form of amateur astronomy which requires only portable equipments. I have small refractors, small binoculars, a small mount, and a small H-alpha solar filter. Originally from a city where the people were proud of their light pollution, that is Hong Kong where I loved. Relocated to the UK since 2021.
Wednesday, February 01, 2017
Friday, January 27, 2017
Polemaster and Sharpcap 2.9+
I went last night without any luck, the sky was too bad.
Tonight the sky seems a bit better, so I went again. A nearby light polluted sky, with the polar region partially blocked.
Since I've tested with Polemaster software, and tonight I play with Sharpcap 2.9+. If the automatic plate solving works, it's simpler for the Polemaster software requires manual pattern matching.
To my surprise, it works out very nicely!
Here's the screen shots of how it works... Plate solving success...
And then rotate along RA, success again...
After polar alignment with Sharpcap, I proceed with the software of Polemaster and it works! Confirmed the alignment.
And then I removed the polarscope caps, saw Polaris in the expected position! I hope I could do some wide field imaging soon!
Tonight the sky seems a bit better, so I went again. A nearby light polluted sky, with the polar region partially blocked.
Since I've tested with Polemaster software, and tonight I play with Sharpcap 2.9+. If the automatic plate solving works, it's simpler for the Polemaster software requires manual pattern matching.
To my surprise, it works out very nicely!
Here's the screen shots of how it works... Plate solving success...
And then rotate along RA, success again...
After polar alignment with Sharpcap, I proceed with the software of Polemaster and it works! Confirmed the alignment.
And then I removed the polarscope caps, saw Polaris in the expected position! I hope I could do some wide field imaging soon!
Wednesday, January 25, 2017
20170125 Sun
Glad that we still have some sunshine today, seeing 5/10, transparency 4/10.
0652 (UT) with reducer:
0655 (UT) with 2x barlows:
Keep on going...
0652 (UT) with reducer:
0655 (UT) with 2x barlows:
Keep on going...
Tuesday, January 24, 2017
20170124 Sun
We have some brief clear moments today, seeing 5/10, transparency 5/10.
0711 (UT) , with reducer:
0717 (UT), with 2x barlows:
BTW, I'm switching my job and my new job will start from mid-Feb... so at the time being, I've more time to observe.
0711 (UT) , with reducer:
0717 (UT), with 2x barlows:
BTW, I'm switching my job and my new job will start from mid-Feb... so at the time being, I've more time to observe.
Monday, January 23, 2017
20170123 Sun
Let's keep thing as monochromatic as it should be.
Full disc at 0700 (UT), taken with a reducer.
Close up of AR2628, with a 2x barlows, 0705 (UT):-
I have to push the exposure and gain really high to show this hedgerow, 0709 (UT), again with a 2x barlows.
Cloud moves around today, seeing 5/10, transparency 5/10.
Full disc at 0700 (UT), taken with a reducer.
Close up of AR2628, with a 2x barlows, 0705 (UT):-
I have to push the exposure and gain really high to show this hedgerow, 0709 (UT), again with a 2x barlows.
Cloud moves around today, seeing 5/10, transparency 5/10.
Sunday, January 22, 2017
20170122 Sun
Seeing quite good at 6/10, transparency 6/10.
0706 (UT), with reducer, rather sharp and finer detail could be seen.
0714 (UT), with 3x barlows, Newton's ring persist as well as some dust artifacts, I did not drift around the image enough while capturing.
Switched to use AutoStakkert!
Wavelet goes back to Registax, and final touch with PS.
0706 (UT), with reducer, rather sharp and finer detail could be seen.
0714 (UT), with 3x barlows, Newton's ring persist as well as some dust artifacts, I did not drift around the image enough while capturing.
Switched to use AutoStakkert!
Wavelet goes back to Registax, and final touch with PS.
PoleMaster
I always said, there are three important basic techniques for astrophotography namely: collimation, focusing and polar alignment. And in Cantonese we said: 對焦,對 pole, 對光軸...
For focusing, I have a motorized focuser. For collimation, I bought the original Bob's knob for collimation. And now for polar alignment, I have just bought the QHY PoleMaster!
To use it in the field, I use my Teclast tablet via OTG cable. And it connects without any problem, I've tried it in day time but the exposure control is very limited so that even at its lowest setting, the screen white out. Can't wait to test it tonight in a nearby location, I hope I could find a place where the Polaris is visible.
--
I really got chance to try it out in the field on the same night.
I only got time to go to a nearby playground but then I don't know if Polaris is visible or not there... After more than half an hour, I guess I made it. Note the bright thick line across was from a distant (not too far away) tower crane! The Polaris is barely visible, and then light pollution was very severe so that pushing the gain/exposure further will only white out the whole screen.
Finding the center of rotation of the Sky Adventurer is not easy by pressing the button since it's just too slow. And instead, I disengage the clutch and move it manually but this is not recommended as stated in the user manual.
Finally, I pulled out my DSLR and tested with my 50mm lens. I stopped the aperture and set ISO low so that I could do a 3-minute exposure under such a sky, star remains pinpoint, good news.
For focusing, I have a motorized focuser. For collimation, I bought the original Bob's knob for collimation. And now for polar alignment, I have just bought the QHY PoleMaster!
To use it in the field, I use my Teclast tablet via OTG cable. And it connects without any problem, I've tried it in day time but the exposure control is very limited so that even at its lowest setting, the screen white out. Can't wait to test it tonight in a nearby location, I hope I could find a place where the Polaris is visible.
--
I really got chance to try it out in the field on the same night.
I only got time to go to a nearby playground but then I don't know if Polaris is visible or not there... After more than half an hour, I guess I made it. Note the bright thick line across was from a distant (not too far away) tower crane! The Polaris is barely visible, and then light pollution was very severe so that pushing the gain/exposure further will only white out the whole screen.
Finding the center of rotation of the Sky Adventurer is not easy by pressing the button since it's just too slow. And instead, I disengage the clutch and move it manually but this is not recommended as stated in the user manual.
Finally, I pulled out my DSLR and tested with my 50mm lens. I stopped the aperture and set ISO low so that I could do a 3-minute exposure under such a sky, star remains pinpoint, good news.
Saturday, January 21, 2017
Friday, January 20, 2017
20170120 Sun
Excellent transparency (Hong Kong standard, of course) 9/10 with quite nice day time seeing at 7/10! However, excessive dust on my CCD renders higher image scale useless... I guess a 3x barlows should be ideal.
First up is the full disc shot, with the reducer at 0614 (UT):-
And then two high power shots without the reducer, but with a 5x powermate, taken at 0628 and 0633 (UT) respectively.
Tuesday, December 27, 2016
20161227 Sun
Cold front coming, seeing exceptionally poor from 0-2/10 at best... cannot properly focus.
0604 (UT) with a reducer, some nice filaments around but cannot go any higher power.
Monday, December 19, 2016
20161219 Sun
We finally have a small active region (AR2619) today!
Here is a 5x shot with a reducer (forgot to remove), note the dust on the CMOS, 0701 (UT):-
And now the full disc, 0655 (UT):-
Here is a 5x shot with a reducer (forgot to remove), note the dust on the CMOS, 0701 (UT):-
And now the full disc, 0655 (UT):-
Friday, December 16, 2016
Tuesday, December 13, 2016
Sun 20161212
Another imaging session, but the sun was not very active so I only took the following full disc shot with my Ranger + reducer lens.
Gain was set to zero this time, 1338 (GMT+8):-
Saturday, December 10, 2016
20161128 Sun
I don't know if this is the first time for me to use the ASI120mm, I had one before but sold shortly, this one was newly acquired.
First one taken with my Ranger with a reducer lens, 1245 (GMT+8):-
Second one with a 3x barlows, 2 frames mosaic... uneven illumination, long time no practice, taken at 1253 and 1255 (GMT+8).:-
After taking the images, I found that I didn't set the gain to zero and it was set at 50% which is very high. No wonder why the result image is rather noisy.
I found no more Newton's ring even at 3x?
First one taken with my Ranger with a reducer lens, 1245 (GMT+8):-
Second one with a 3x barlows, 2 frames mosaic... uneven illumination, long time no practice, taken at 1253 and 1255 (GMT+8).:-
After taking the images, I found that I didn't set the gain to zero and it was set at 50% which is very high. No wonder why the result image is rather noisy.
I found no more Newton's ring even at 3x?
Wednesday, August 31, 2016
Monday, August 29, 2016
A new budget notebook
My Asus Eee has been repaired several times, I've replaced its keyboard, hard drive, battery and even CPU/chipset fan. The transformer is dying so that I could use it either to charge up the battery or to operate the computer but not both, otherwise, the computer will reboot itself randomly. Worst yet, it is still running Windows XP and would be obsolete enough soon, for example, no more dropbox in the near future.
So I took the plunge to buy a new notebook, but I was on a budget. I want something light and small, despite I could use my Teclast tablet when I want absolute portability. Finally, I got a Acer Aspire ES 11 which features a bigger display, and it's lighter in weight and has better battery life. USB 3.0 port is available as well, but of course, it won't be much faster. This is a fact of life, you choose only two: cost, performance, portability.
I have installed everything there so that it would be my next work horse. ASI 120mm and 120mc drivers were installed, that megapixel monochrome camera too! No more dropped frame with the all the cameras. So nice!
So I took the plunge to buy a new notebook, but I was on a budget. I want something light and small, despite I could use my Teclast tablet when I want absolute portability. Finally, I got a Acer Aspire ES 11 which features a bigger display, and it's lighter in weight and has better battery life. USB 3.0 port is available as well, but of course, it won't be much faster. This is a fact of life, you choose only two: cost, performance, portability.
I have installed everything there so that it would be my next work horse. ASI 120mm and 120mc drivers were installed, that megapixel monochrome camera too! No more dropped frame with the all the cameras. So nice!
Friday, July 15, 2016
20160715 Sun (and also 20160716, added on 20170916)
Got a half day off today with the kids, found that the sun could be seen from another room with a less desirable angle, anyway, why not?
Pull out everything and went to another room, the view was a bit blocked but still do-able. The JMI focuser controller is oh-no, low battery and cannot move at all. Removing four screws and replace the battery is time consuming, the sun was going away. My Teclast was low battery, too, just 7% left... what's bad is that, I couldn't charge it and use the USB port for my cheapy bw cam at the same time... So, I took the plunge and do it all without all those adversities.
Click for full size, taken at 0724 (UT)... T-max does not tuned well, aligned with only a single point, i.e. AR 2565. I had just ordered an ASI 120mm (again) in the hope to get better image, let's see. Why I was selling that was due to the Newton's ring, and my current bw cam got Newton's ring too...
--
20170916 Sun
I found that there is an unprocessed clip in my home NAS, and just did the processing and add it back.
Surprisingly similar to the one above, maybe the file name was incorrect? But it was generated by Sharpcap... anyway, just as a record.
Pull out everything and went to another room, the view was a bit blocked but still do-able. The JMI focuser controller is oh-no, low battery and cannot move at all. Removing four screws and replace the battery is time consuming, the sun was going away. My Teclast was low battery, too, just 7% left... what's bad is that, I couldn't charge it and use the USB port for my cheapy bw cam at the same time... So, I took the plunge and do it all without all those adversities.
Click for full size, taken at 0724 (UT)... T-max does not tuned well, aligned with only a single point, i.e. AR 2565. I had just ordered an ASI 120mm (again) in the hope to get better image, let's see. Why I was selling that was due to the Newton's ring, and my current bw cam got Newton's ring too...
--
20170916 Sun
I found that there is an unprocessed clip in my home NAS, and just did the processing and add it back.
Surprisingly similar to the one above, maybe the file name was incorrect? But it was generated by Sharpcap... anyway, just as a record.
Saturday, July 09, 2016
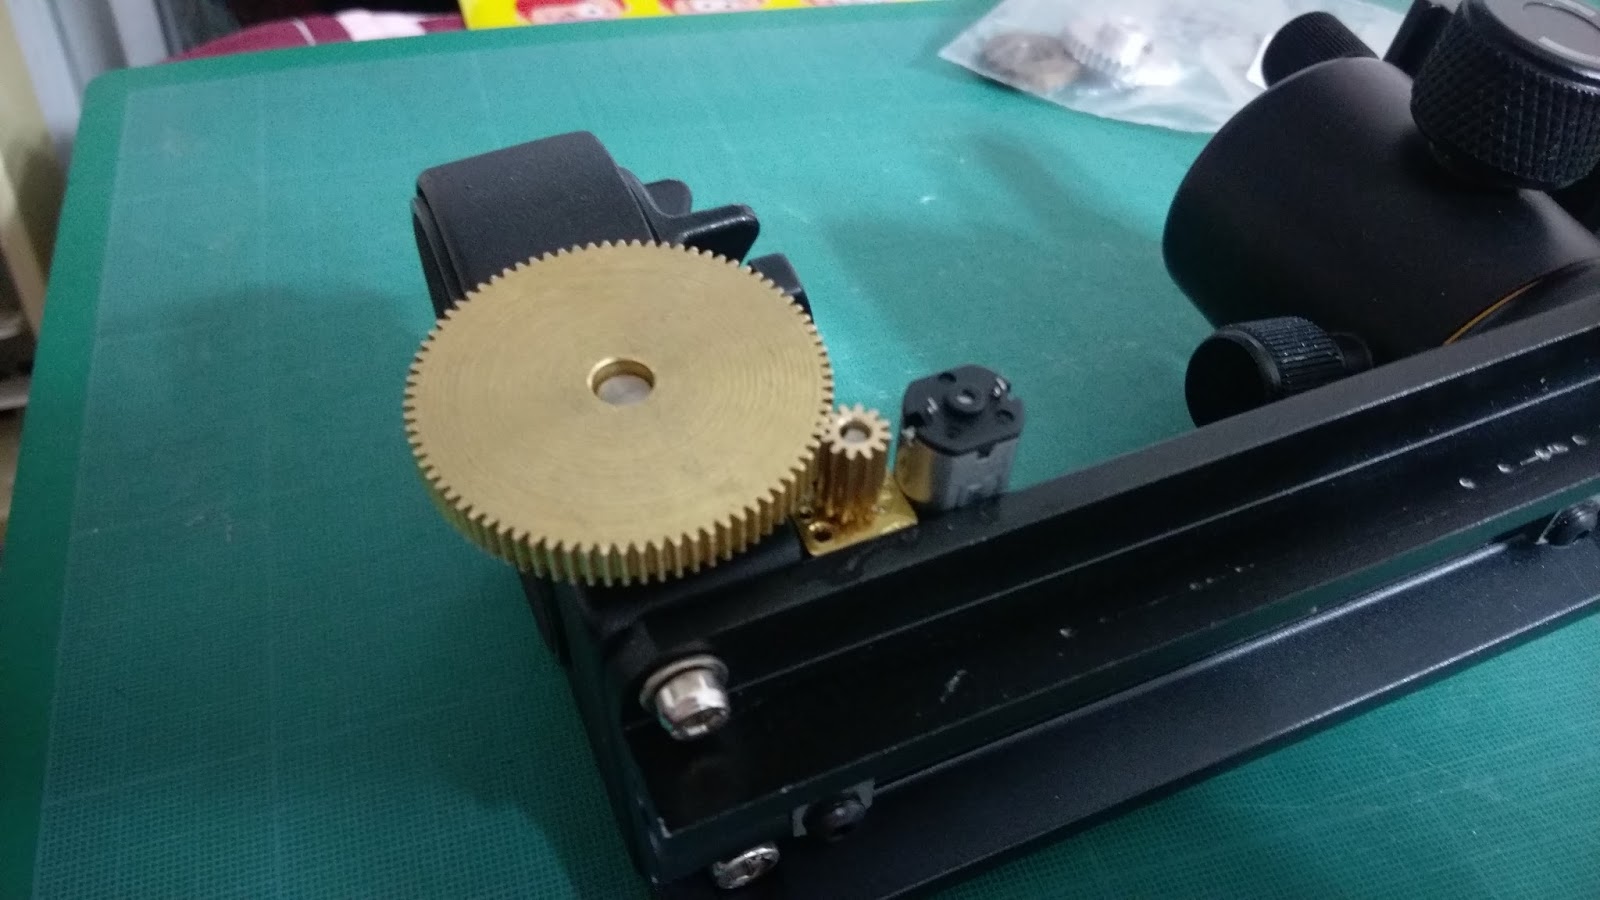
Motoring the DEC axis of the Sky Adventurer mount
Found suitable gears and motor, installed them right away.
Step one: try to find the suitable location for the motor for correct gear meshing, fix it with a tape:
Then, use some instant glue to fix it in place, add hot melt glue to further reinforce the position.
Finally, solder cables and also standard jet for connection to the controller box. Add hot melt glue to insulation the bare end of the cable.
Done.
A short clip before the soldering work to show the gear meshing:
Step one: try to find the suitable location for the motor for correct gear meshing, fix it with a tape:
Then, use some instant glue to fix it in place, add hot melt glue to further reinforce the position.
Finally, solder cables and also standard jet for connection to the controller box. Add hot melt glue to insulation the bare end of the cable.
Done.
A short clip before the soldering work to show the gear meshing:
Sunday, June 26, 2016
Enhancing the Nexstar mount
Last time I pulled the whole setup to a nearby playground, I managed to put the OTA, the tripod and every accessories inside a medium sized backpack. And the Nexstar mount was placed inside another bag. It's very portable indeed.
The backlash has to be adjusted further for high power imaging.
For the power, I used 8 AA rechargeable batteries, and it gives ~2400mmAh at around 9.6V, after playing for around two hours, I guess only 50% power was left.
I've tried to fit 3 pieces of 18650 inside the battery compartment last time, and it's even smaller than 8 AA! So I took the plunge to remove the original battery box and replace it with a 18650 battery box.
With higher quality 18650, say 3400mmAh (measured by myself), now I've 3400mmAh at around 11.1V so it should last even longer. With my current charger, I could recharge them at once, instead of two times (i.e. four at a time), and it's much more efficient, too. The cost of the 18650 is similar to AA rechargeable, by similar, I mean the cost of one piece of 18650 is similar to that of the cost of one piece of AA rechargeable! So, the overall cost is less than a half.
And it's lighter too!
The modification is simple and even reversible, just some very simple soldering work.
The backlash has to be adjusted further for high power imaging.
For the power, I used 8 AA rechargeable batteries, and it gives ~2400mmAh at around 9.6V, after playing for around two hours, I guess only 50% power was left.
I've tried to fit 3 pieces of 18650 inside the battery compartment last time, and it's even smaller than 8 AA! So I took the plunge to remove the original battery box and replace it with a 18650 battery box.
With higher quality 18650, say 3400mmAh (measured by myself), now I've 3400mmAh at around 11.1V so it should last even longer. With my current charger, I could recharge them at once, instead of two times (i.e. four at a time), and it's much more efficient, too. The cost of the 18650 is similar to AA rechargeable, by similar, I mean the cost of one piece of 18650 is similar to that of the cost of one piece of AA rechargeable! So, the overall cost is less than a half.
And it's lighter too!
The modification is simple and even reversible, just some very simple soldering work.
Friday, June 24, 2016
20160623 Nam Cheong Playground Planet Imaging Night
I had virtually stopped planetary imaging after the shut down of my home@walnut observation point inside my home.
Tonight, I pulled out my C5 with the Nexstar mount to a nearby playground for planet imaging. While most people were jogging (I use to jog there too), I took a seat on the grass and started imaging.
I feel like an idiot since I spent long time just to center my targets enough for imaging. I still remember that I could do imaging with my C8 at f/50 but now I found a hard time using my C5 at f/20!
This is my mobile imaging station. There is a tiny Gitzo G106 below, and a small projector metal plate to support both my Nexstar and my 10" Teclast Windows 8.1 tablet with a keyboard. It won't be very stable as expected.
Transferring huge AVI files for imaging processing is slow. My first target was Jupiter but then the processing of Mars was faster.
1345 (UT), this is stacked without further processing basically.
1347 (UT), this one is aggressively processed but it does not help much, maybe even worse... anyway.
Both taken with my C5 with a Tele Vue 2x barlows. Without a IR blocker, the image is no good as expected.
Jupiter C5 at prime focus, 1308 (UT):-
With 2x barlows, 1319 (UT):-
Much worse than what I could do previously with a C5, I shall practise more.
Tonight, I pulled out my C5 with the Nexstar mount to a nearby playground for planet imaging. While most people were jogging (I use to jog there too), I took a seat on the grass and started imaging.
I feel like an idiot since I spent long time just to center my targets enough for imaging. I still remember that I could do imaging with my C8 at f/50 but now I found a hard time using my C5 at f/20!
This is my mobile imaging station. There is a tiny Gitzo G106 below, and a small projector metal plate to support both my Nexstar and my 10" Teclast Windows 8.1 tablet with a keyboard. It won't be very stable as expected.
Transferring huge AVI files for imaging processing is slow. My first target was Jupiter but then the processing of Mars was faster.
1345 (UT), this is stacked without further processing basically.
1347 (UT), this one is aggressively processed but it does not help much, maybe even worse... anyway.
Both taken with my C5 with a Tele Vue 2x barlows. Without a IR blocker, the image is no good as expected.
Jupiter C5 at prime focus, 1308 (UT):-
With 2x barlows, 1319 (UT):-
Much worse than what I could do previously with a C5, I shall practise more.
Wednesday, June 15, 2016
Potential power source for the Nexstar mount
I had been using 3 pieces of 18650 in parallel to provide power to my Nexstar mount via the external power socket. The internal AA battery compartment is also used as a backup source.
Last night I tried to pull out the AA battery compartment and I found it easy, it was just fixed there using double side sticky tape. I tried to fit in my 3 pieces 18650 battery pack there and it has more space than enough, and such a modification is easily reversible too!
It even has enough space for a electrical coupler and thus no soldering required. I'd love to find/make a replacement battery cover after the modifications.
Last night I tried to pull out the AA battery compartment and I found it easy, it was just fixed there using double side sticky tape. I tried to fit in my 3 pieces 18650 battery pack there and it has more space than enough, and such a modification is easily reversible too!
It even has enough space for a electrical coupler and thus no soldering required. I'd love to find/make a replacement battery cover after the modifications.
Monday, June 13, 2016
Counter weight solution notes
Time to DIY something just in case...
The Star Adventurer has a M8 threaded hole, while my self adapted Mark-X has a 3/8" threaded hole on the other side....
I've a compact metal shaft with a 3/8" male thread, and 15mm diameter, no stopping screw or safety mechanism.
Just a note.
The Star Adventurer has a M8 threaded hole, while my self adapted Mark-X has a 3/8" threaded hole on the other side....
I've a compact metal shaft with a 3/8" male thread, and 15mm diameter, no stopping screw or safety mechanism.
Just a note.
Field Power
Years I ago, I have a SLA battery which is powerful but extremely heavy, and then I made a bracket to use it as counter weight.
Later, I used 18650 batteries and it's much lighter. And it's about as powerful as SLA.
Recently, I used USB power banks and it's even more compact in size, and it's airline portable too!
Problem is that, some USB power banks will stop delivering current, maybe they want some sort of hand shakes between devices. I found a very old USB power bank which will keep on kicking with any load, and this is great.
The Sky Adventurer was now powered directly via USB, the Nexstar mount is powered via USB to 12V cable, and the GOTO Mark-X is powered via USB to 9V cable. Very neat and portable!
Later, I used 18650 batteries and it's much lighter. And it's about as powerful as SLA.
Recently, I used USB power banks and it's even more compact in size, and it's airline portable too!
Problem is that, some USB power banks will stop delivering current, maybe they want some sort of hand shakes between devices. I found a very old USB power bank which will keep on kicking with any load, and this is great.
The Sky Adventurer was now powered directly via USB, the Nexstar mount is powered via USB to 12V cable, and the GOTO Mark-X is powered via USB to 9V cable. Very neat and portable!
GOTO Mark-X further modifications
It could be the only mount that I had, and could hold a bigger OTA!
I took the controller out, and modify it a bit to accept center positive power cord, and I could power it via my USB to 9V cable. The current draw is about the same as it states, less than 200mA. Funny is that, if you pause the motor, the current draw is maximum. 4X speed does not increase the power drain, too.
So, I also pulled out my Sky Adventurer base to fit them together. I've used a simple tripod quick release base to match the 1/4" of the Mark-X, and it's a perfect fit.
No more need to use that 410 geared head for this purpose, this is also lighter and more accurate. If I buy a strong tripod, plus adding a counter weight mechanism, it could take a C8, I believe.
Guess what, I always want a C8 after selling it. But right now, I don't think I have the time and energy to have one yet, or otherwise, I will buy one immediately.
I took the controller out, and modify it a bit to accept center positive power cord, and I could power it via my USB to 9V cable. The current draw is about the same as it states, less than 200mA. Funny is that, if you pause the motor, the current draw is maximum. 4X speed does not increase the power drain, too.
No more need to use that 410 geared head for this purpose, this is also lighter and more accurate. If I buy a strong tripod, plus adding a counter weight mechanism, it could take a C8, I believe.
Guess what, I always want a C8 after selling it. But right now, I don't think I have the time and energy to have one yet, or otherwise, I will buy one immediately.
Monday, May 16, 2016
Nexstar 4/6 SE mount power comsumption
I bought a small USB power meter, and I sandwiched it between my USB power bank, and the USB -> 12V cable which is connected to my Nexstar 4/6 SE mount.
It was drawing 0.51A at 5.14V which is less than what I imagined. When both motors were slewing at maximum slewing speed, it measures around 0.8-0.9A only! Therefore, a USB power bank should be enough for a whole night of observation.
Fixing the Sky Adventurer
My Sky Adventurer was getting harder and harder to turn... it was kind of stuck even if you totally disengage the clutch, it won't turn unless you really force it.
On opening it, the problem was nearly shown, see below:
there was a circular scratch mark on the inner rotating axis! Obviously, it shouldn't be there and it should be caused by some metal dirt or uneven machining? So I cleaned up the surface and found a few small marks, they're so small that even if you touch them, you won't feel there's anything... I bought the finest sandpaper to sand those stuff down, and then put the inner axis in, rotate it a few times, and there are two dirty patch will form, and then I sand them down again and again.
Finally, they were gone.
You couldn't trust your finger, you won't feel it. But if you turn the inner axis with it, dirt patches will form. So after a few runs, they were all gone!
The gear was not machined very nicely, and I sand down those rough edges like the one which is shown below:
Placing some grease back (thank Eric Ng), and now it's very smooth! The machining is not bad afterall, when I put the inner axis back even without grease, it feels like pressing a syringe!
I'll them it along for camping and stargazing trip soon!
On opening it, the problem was nearly shown, see below:
there was a circular scratch mark on the inner rotating axis! Obviously, it shouldn't be there and it should be caused by some metal dirt or uneven machining? So I cleaned up the surface and found a few small marks, they're so small that even if you touch them, you won't feel there's anything... I bought the finest sandpaper to sand those stuff down, and then put the inner axis in, rotate it a few times, and there are two dirty patch will form, and then I sand them down again and again.
Finally, they were gone.
You couldn't trust your finger, you won't feel it. But if you turn the inner axis with it, dirt patches will form. So after a few runs, they were all gone!
The gear was not machined very nicely, and I sand down those rough edges like the one which is shown below:
Placing some grease back (thank Eric Ng), and now it's very smooth! The machining is not bad afterall, when I put the inner axis back even without grease, it feels like pressing a syringe!
I'll them it along for camping and stargazing trip soon!
Subscribe to:
Posts (Atom)