We have the following common estimations of telescope resolution, the first one is called Dawes's Limit, which is probably the best known among amateur astronomer, it's more like an empirical formula:
Resolution in arc sec = 116 divided by aperture in mm
And the second one is Rayleigh Criterion, the formula is:
Resolution in arc sec = 140 divided by aperture in mm
Finally, we have another one called Sparrow limit:
Resolution in arc sec = 70 divided by aperture in mm
All the above is estimated with different assumptions, for example, they assume green light (~550nm) and they're for point light source. That said, the above probably couldn't be reached with atmosphere distortion like seeing and poor transparency - constrast will also affects the resolution. For example, you can resolve two dots with completely different color like red and yellow, but if they're both very similar in color, like both are red (zero contrast), you will not be able to resolve them at all.
Despite they're for point light source, they could be a nice approximation for extended objects. Okay, let's give an example again using the 33 arc min sun as our target. Yes, it's not point light source, but we just use the above as estimation. Suppose we use Dawes's limit, and we have a 40mm filter like my Solarmax 40:
Resolution in arc sec = 116/40 = 2.9 arc sec
The sun is 33 arc min in size, and we will want at least two pixels to cover any resolvable feature by sampling theory, so we have a sun of:
33 * 60 / 2.9 * 2 = 1365.5 pixels
And therefore, in order to get what a 40mm can deliver, we will want to create solar image with above size, by using a particular combination of CCD chip and telescope focal length.
Friday, June 29, 2007
Image size on the CCD
In order to calculate proper sampling, we will need to calculate what's the size of our target on the CCD given the focal length. Let's use the sun as an example, the sun is about 33 arc minute in size, so we have the following simple diagram:
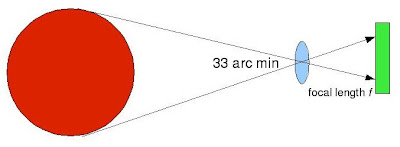
Of course, it's not on scale, but anyway. Now, suppose we have a lens of focal length f and with simple trigonometry, we can find the image of the sun on the CCD.
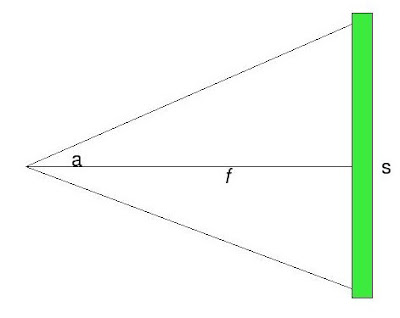
Angle a equals to 33 arc minutes as its vertically opposite angle shown in the first diagram. So, the image size s on the CCD is can be found by solving:-
tangent (a/2) = (s/2) / f
So, let's plug in the figures, for example, the image size of the solar disc on the CCD, with my Borg 45ED II which has 325mm focal length:-
tangent (33 arc minute / 2) = (s/2) / 325
s = 3.1198mm
It's pretty small, right? What's the size in terms of pixel? For example, my DMK31AF03 has 4.65um pixels, and thus, the solar disc will cover:
3.1198mm / 4.65um = 670.9 pixels
i.e. the full size solar image will be 670.9 in size at prime focus. With a 2x barlows, it will become 1341.8 pixels.
Thursday, June 28, 2007
Pixel size and solar disc size
With my DMK 31AF03, solar disc will be around 680x680 pixels when used with my Borg 45ED II at prime focus, it's pretty good and simple to do without using mosaic.
With a 350D, I have just substituted the pixel size into the same formula and the solar disc will become around 480x480, not bad too. With a 2x barlows, the solar disc will become 960x960 which is still well within the large chip.
It's definitely a good ooportunity with the PST-BF5 in straught through configuration.
Let's see if it's a good setup for daily snapshot, I believe focusing will be the main issue. At 325mm, I hope a tripod won't be required, but of course when a 2x is used, it becomes impossible.
Sunday, June 24, 2007
20070624 Prominence session
Pretty boring sun again, except a few prominences. There were thin cloud all around, capturing surface detail become entirely impossible, capturing prominences could be done by overexposure to by-passing through the cloud, it's no good, but better than nothing. Typical day time seeing at around 2-3/10.
Close up of prominences taken with 2x barlows, full disc without, all by Borg 45ED II, SM40/BF10, DMK31AF03:-

Click for full size.
Close up of prominences taken with 2x barlows, full disc without, all by Borg 45ED II, SM40/BF10, DMK31AF03:-

Click for full size.
Thursday, June 21, 2007
20070621 Short moon experiments
Again trying to show the color of the moon, this time, I used my Borg 45ED II with ToUCam Pro at prime focus, since the moon is not full, the tiny ToUCam chip can fit in the whole half.
Then I use 2x barlows to take two separate shots, to verify if the color is consistent or not.
First shot is a normal shot:-

Next is a saturation pushed shot, notice some horizontal strip-like artifacts:-

Finally, the next two shots are taken with barlows, but it seems like the color balance is not well maintained, thus, I even not tried to push the color, it sounds like that I should try to do proper white balance before the shots, lock the white balance setting, so that it would be consistent next time:-


Tuesday, June 19, 2007
20070619 Through the cloud
Happy Dragon Boat Festival!
I begin to recover from the terrible flu today, so that I have some energy to take solar images. It has been 5 days, health is a step away, everybody please take care.

Taken on 1509 (GMT+8)

Taken on 1511 (GMT+8)
Talking about Dragon Boat Festival, Chinese will make rice dumpling, and some rice dumpling has an boiled egg yolk inside (and/or pork), the sun today is featureless like such an egg yolk!

A more egg-yolk feeling version, 1510 (GMT+8)
A video clip:-
Monday, June 18, 2007
Equipment thoughts
1. DSLR: it was found that 400D is not very nice for astrophotography, what I mean is, it's good, but it's not as good as 300D/350D. It really makes me re-think my plan entirely, maybe it's better to buy a 2nd hand 300D/350D and use it exclusively with my Borg 45ED II plus some cheap lens like 50mm f/1.8 and forget about daily usages.
However, given the fact that I ain't going to do very long exposure with my TG-SP II, maybe it's sufficient? Say 200mm f/2.8 at around 3 minutes. I don't know.
2. Visual: just read an article in S&T, someone suggested that 5" refractor at around 20x is about the best stuff for visual observations, sounds like a Borg 125ED is still on my dream list.
Monday, June 11, 2007
Downsizing a PST
I bought the PST for disassembly, for upsizing.
But from yesterday, I begin to think whether I can downsize it or not. After downsizing, I hope to make it short enough, to be used without a tripod, and for afocal imaging so that I can do some daily snapshot of the solar disc in H-alpha.
With the existing PST etalon adapters, I can add a very small objective lens on the 1.25" barrel end, and a simple 1.25" red filter can be used as the ERF, and the the eyepiece end will be used with a PST-BF5.
For the objective, I found a 21mm f=200mm lens available, that's close to f/10 which makes it an excellent match with the PST etalon module. With an overall length of 200mm, it will be truely portable, and the low power will allow me to use without a tripod.
For example, if I used a 40mm eyepiece, the magnification will be as low as 5x.
The PST etalon module together with the adapters and the PST-BF5 will take as much as 12cm of optical path, so with the 1.25" thread extension tube, it's about enough to take up the whole 20cm focal length, the "OTA" can therefore be a short paper tube.
Seems reasonable, I shall try out this concept when all the adapters come back.
Sunday, June 10, 2007
Opportunities from PST-BF5
My PST etalon adapter has been sent to my friend for modification, after that, the PST-BF5 can be used with it other than a regular BF10.
Such configuration will:-
1. reduce the optical path length of the whole system
2. allow higher light transmission
3. allow straight through usage
(1) is a result of shorter PST-BF5, and thus, a Herschel Wedge might be used as an ERF (Herschel Wedge requires a lot of back focus). (2) also enable similar usage, for the Herschel Wedge cuts too much light when used with a BF10, which is far more opaque. (3) is great to make it more portable, why straight through is more portable? since I found it hard to use a 90 degree diagonal without a tripod, straight through will make it easier for pointing.
Let's see the result later!
Cheapy-ERF and Herschel Wedge
Given the Cheapy-ERF is ready, it's time to explore its opportunities on white light imaging. Herschel Wedge cannot be used on compound telescope usually, but if there's a ERF on the aperture end, I believe it's use-able.
Without anything on the aperture end, sun light kill burn the OTA of a compound scope, or at least deterioate the coating on the secondary, etc. After using the Cheapy-ERF, sun light will not burn the OTA and it will thus be safe.
The transmission through-put of Cheapy-ERF lies between a Polariser filter and a ND3, so I suppose if a Cheapy-ERF is used at the front, maybe we just don't need to Polariser any more.
Experiment will tell.
The image quality, however, will be limited by the Cheapy-ERF. But at least, the setup will be more durable than a Baader film.
Friday, June 08, 2007
Peltier cooling: Yakult!

Today I tried to do an extended test on the Peltier/heat sink/fan setup.
I apply 12V DC to the fan, and 6V DC to the Peltier module, at around 30 degree celcius room temperature, the setup can sustain for over 20 minutes of operation (I guess it can do longer), the heat sink is very warm, but not hot to touch at all, and the Peltier module remain very cold, that means the heat sink and the fan is effective enough to keep the system running.
I placed a Yakult on top of it as the load, but then I found I better place it upside down since the foil cap is more heat conductive than the plastic bottom.
After this test, I'm confident that, the system will run fine at 5V for the Peltier and 12V for the fan, being conservative. So, it's time to find a good plastic box to hold the DMK plus the peltier, leaving the fan and heat sink outside, put dessicant there and do the soldering to make it elegant.
--
Before this test, I tried to put 12V on the Peltier and the heat sink become so hot very quickly, and so I disconnected it to avoid damaging the Peltier.
New Mini-Borg to NGF-S adapter
Here's the updated drawing of the adapter, now it has 2+6+3 = 11mm inside the focuser which is held by three set screws in the groove, it must be secure.
I've measured the outside diameter to be exactly 56mm (or slightly smaller), when I tried to measure in "inch", it gives a non-integer value.

And for the 57mm thread, it's 4mm long. No need to make a stop for the thread as we can see from the Borg's side, it actually has a stop there.

The original SCT adapter of the NGF-S focuser for reference:-

No need to make that long 50mm tube as found in the original SCT adapter for it's useless.
Thursday, June 07, 2007
A $80 HKD mistake: Cheapy ERF cell
I wrongly write 15.5cm for the inner diameter of the Cheapy ERF cell, it should be 14.5cm and of course, it's larger and will not be a good fit. The gap between the cell and the OTA is 0.5mm which is not too large luckily.

To fix the problem, I will make another ring myself by using thin wooden board to make up the gap. This board is relatively easy to make, and I've a dull black board which shold serve the purpose very well, I'll have to paint the aluminium ring black even if it fits, now the wooden board will do the same job.

It might not be very elegant, but it should certainly be firm and secure.
Originally, the hardest part to make this cell is the three set screws, I need to drill and tap thread to it so that I can fix it on the original aerial lens cell, and I don't have suitable equipments. Now, I am to add a wooden ring to make up the difference, the supporting part will be the whole ring instead of that three screws, so the whole thing will be secure. However, if I were to make the ring from scratch by myself, I will doubt whether the screws will be enough or not for the board itself is rather fragile given the screws are small.
--
After around 10 minutes word with a hand cutter, I managed to make an ugly ring by myself. By ugly I mean the cutting are not concentric, but since the Cheapy ERF has more aperture than I require, it will be totally covered. I've conducted some test last night to see if it's a good fit, I'd say it's perfect.

First test is to invert the OTA so that the Cheapy-ERF is forward downward, it won't fall and then I tapped it with my hand, it won't even move.

Second test is to pick up the whole OTA by using holding the Cheapy-ERF, the OTA life up and it's still very firm.
Excellent fix I would say.
Wednesday, June 06, 2007
Thoughts about total solar eclipse
Having read several articles about total solar eclipse, I conclude that photography is second, visual observation is the absolute first.
Therefore, I've the following rough plan and more thoughts and considerations should be taken place:-
1. Setup a H-alpha scope, for me basically my Borg 45ED II, and shot with my DMK 31AF03 before totality, a video camera should be placed along, on the same small GEM, like my TG-SP II
2. Once totality is near, attention should be shifted to visual observation, take off the DMK and the H-alpha filters from the Borg, place a diagonal there and leave it alone.
3. When totality begins, insert an eyepiece with around 40-50x magnifications, have some visual view; at the same time, take some snapshots with a DSLR if I will ever buy one (200mm is a good star with suitable, don't go too high), attention should be paid to visual observation alone
4. When totality is about to end, cover the Borg
So, after the event, I will have a video taken automatically by the video camera, I should have a couple of snapshots of the eclipse, and I should have great visual impression.
I shall attempt to do:-
1. To merge a white light shot with H-alpha shot just before/after the eclipse
2. To capture totality together with some background stars
3. To stack some totality images to make out the corona
I still have more than one year to plan and to think. :-)
Peltier cooling the DMK?
Time to re-consider this route, I've a Peltier module at home, and it's attached to a CPU heat sink with fan. Since the DMK is pretty small, I suppose I can simply put the Peltier module on the camera body to cool it, at least to test whether it effective or not. A cold finger to the CCD chip inside would be even better, but that would be the next step.
The major problem of cooling would be the moisture, dew will form very quickily in Hong Kong given anything below room temperature. To solve this issue, I believe that a Baader UV-IR block can help to keep moisture from going inside the camera, and the whole camera should be placed inside a small box with plenty of desiccant.
It's time to check out how much voltage I should apply to:-
1. CPU fan
2. Peltier module without overwhelming the fan
And instead of desiccant, maybe I can use heat wire to drive away the moisture first? If yes, how much voltage should I apply?
This would be an interesting project, and see if I will have time to conduct the experiments.
--
I've decided to make it into different phrases:
Phase 1: to use heat sink and CPU fan alone, for that matter, a CPU fan requires 12V normally, and the red pin is +12V and the black pin is 0V, and the yellow one is for sensor which is not needed for cooling a camera.
Once it's finished, I can try to proceed to phrase two.
Phase 2: peltier module is added, but this time, the hardest part is to place the whole camera into a box containing desiccant, should begin to look for a suitable box.
--
I've conducted some tests tonight:
1. With 9.6V DC applied to the Peltier module, it cools down very rapidly but the heat sink is also overwhelmed pretty quick, I doubt even if I turn on the fan (connection not ready), it won't be fast enough to take away the heat.
2. With 2.4V DC applied to the Peltier module, it cools down quite good, but the temperature drop is not significant, the heat sink alone is enough not to overwhelm the system, I guess higher voltage can be applied.
3. The 12V DC fan will not move a bit with 2.4V...
4. With 4.8V DC applied to the Peltier module, it cools down very nicely but the heat sink cannot sustain the heat loading, got to test if the 12V DC fan is enough to drive away the heat.
I guess I will use at least 9.6V (8 AA rechargeable) for the fan, and use around 4.8V (4 AA rechargeable) for the Peltier. Need to find a good box for the DMK.
Borg 45ED II improvement and PST etalon adapters enhancements
Last night I pulled out my Borg 45ED II to see if I can make it even lighter and to give a bit more back focus. Currently, it is connected to a JMI NGF-S for fine focusing, and the connection is done by a Borg M57 to 2" visual back, a 2"->SCT adapter plus a SCT adapter on the NGF-S. It took around 1.5cm of back focus. To simplify this chain of adapters, we need an adapter like the following:-

The M57P0.75 male thread (4mm of thread) is to connect to the Mini-Borg tube directly, and the other end is to be inserted into the NGF-S directly.
An updated drawing:-

The blue part is the M57P0.75 thead which is 4mm long, the red part is the focuser body to show how it's fixed inside the focuser, there are 3 set screws to fix it on the groove of the adapter, and the focuser (red part) will serve as the stop to the M57P0.75 thread, so no need to make one on the adapter.
See below the original adapter has 56mm on the outside, and 50mm barrel (to the inside of the focuser) is not needed, for it does not help to fix the adapter inside the focuser at all.
Also, when the adapter sits inside the focuser, the M57 thread will have a natural "stop" so that no "stop" has to be made on the adapter.

For the PST etalon module adapter, I found that the PST visual back (eyepiece holder or blocking filter) can be screwed into the PST etalon adapter's 1.25" port if proper thread is machined there, and it won't affect it to accept a BF10 if needed.

after making the matching thread, they will be able to screw together:-

Tuesday, June 05, 2007
Money on Astronomy
I've spent well over 10k USD in astronomy in around 10 years, but I feel my current equipments are stll quite disorganized, and there are still quite many things which my existing stuff cannot do well.
Among this 10K USD, around 1K is lost due to equipment selling, 1K is used for books and magazines.
I've 2.5 refractors, and an SCT... one of the refractors is no longer actively used but it has a special place in my heart.
I've 3 mounts, and two camera heads... one of the mounts is no longer actively used.
I've a four filtering systems for the sun: two H-alpha, one CaK and one white light.
I've two cameras for planet imaging, one color and one monochromatic, and the monochromatic one can be used for simple deep sky imaging, too.
What I need to compelete the puzzle:-
1. A DSLR and a couple of lenses to take wide field shots, some deep sky works
2. A better medium duty GEM to be used with my half-share of Sky90, be it a Tak EM10, or Vixen Sphinx, or whatever
But will it come to an end afterward? I am sure not, but it will certainly be the last few pieces for a complete setup, what I meant by complete is, I can do nearly whatever thing I wanted.
Focal reducer considerations
It depends on which camera that I will use most. If it's the DMK, I will go for a f/3 reducer for it maximizes the photographical speed. However, if I go for a DSLR, I will probably go for a f/6.3 reducer for a f/3 reducer cannot be used in that case.
Antares has a f/6.3 reducer which is relatively cheaper, and I've searched around and found that it actually has 4 elements like those from Meade and Celestron, so quality and design should be quite similar.
So, here is the situation:
1) DSLR: I will probably go for one very soon, should be before the total solar eclipse in August 2008, and I will be using it mostly with camera lens like Canon EF 200 f/2.8L and Canon EF-S 10-22mm, or maybe also a 50mm f/1.8. The only scope which I might use would be a Borg 45ED II, since I don't have a good enough mount to use it with my C5 or Sky90, therefore, it seems like the focal reducer plan does not have to include DSLR as a major concern, unless I go for a better mount.
2) DMK: I will be using C mount lenses for most cases, my existing collection includes a 8mm, a 25mm, a 75mm and a 150mm. The only telescope which I will use will be again my Borg 45ED II, and maybe probably the C5 given if I use a very strong reducer like f/3.
Therefore, from the above, it seems like a reducer is not very relevant for both cases.
1) Borg 45ED II: when used with f/6.3, it will be like f/4.55 effectively; when used with a f/3.3, it will be like f/2.4... maybe f/6.3 with my existing binoviewer corrector plus extension tube, it will be like f/3.7, not bad. So, it seems like the f/6.3 can serve both the DMK and DSLR for good results. At f/2.4, my Borg will be like a 108mm lens which is even shorter than my 150mm f/3.5 C mount lens, at f/4.55, it will be like a 200mm lens which could be duplicate with my planned 200mm f/2.8...
2) C5: I won't be using it with DSLR even with a f/6.3 for it's too long focal length for my existing mounts, with a f/3.3, I can probably use it with my DMK.
Considering the above factors, a f/6.3 would be more suitable for me, but if I go for a 200mm f/2.8, reducer is not needed at all.
Monday, June 04, 2007
My LXD55: firmware update and USB to serial adapter

I obtained an Autostar update clone cable from AstroGadget on ebay. I also obtained a USB to serial adapter locally to run the LXD55 from my notebook which does not have a serial port.
I updated the firmware to the latest version, which supports PEC, three stars alignment, high precision pointing, etc.
I updated using my desktop PC which has a serial port, but later I found that I should have used my notebook to do this, since sudden power interruption will not kill the Autostar during the update for notebook can run on battery while my desktop PC cannot.
I found that the USB to serial adapter can work well for controlling the Autostar, but it is not very compatible when using it to update firmware, sometimes it could stop in the middle. On using my desktop PC with a real serial port, the problem gone.
Finally, I conducted all the calibration, driving training, backlash values setup, etc after the firmware upgrade.
Remarks: when firmware upgrade process died in the middle, one can go to safe mode (safe loader) to re-do the process again, simply turn off the power of your mount, press and hold the "ENTER" key and the scroll down Key located to the right of the help key on the Autostar handbox, turn the power on.

The USB to serial adapter works without problem for remote scope control or autoguiding.
My Ranger
Just found a photograph of my Ranger on top of my friend's LXD75, together with another scope, so put it here as storage:


Sunday, June 03, 2007
20070603 Solar
AR960 comes into the view and it's in the center of the stage of this session, this is big and impressive in white light, CaK, and it looks rather special in H-alpha, too.
1604 (GMT+8) H-alpha, Borg 45ED II, prime focus, SM40/BF10:-

1607-1610 (GMT+8), H-alpha, Borg 45ED II, 2x barlows, SM40/BF10, 4 frames mosaic:-

Three CaK shots, 1x, 2x and 5x, taken on 1614, 1617 and 1620 (GMT+8):-


White light and infrared view of AR960, 5x, taken on 1622 and 1624 (GMT+8):-


Finally, a white light full disc shot, taken on 1627:-

Saturday, June 02, 2007
20070602 Venus
I didn't target on Venus for very long, but since I got a Baader CaK which can be used on Venus, I always want to try it out again. Tonight, my daughters and my wife have gone to visit our friend, and thus I've some time. And the most important thing is, my baby daughter's (also my housemaid's) room has a window facing west, and Venus can be seen there, so I tried.
I setup my LXD55 and C5 there, since it's rather close to the window, I even couldn't use the counter weight shaft at first, and I found problem tracking nicely.
Eventually, I setup everything (very hard man!), and it's 32 degree Celcius inside, I'm all wet!

So, I plug in my DMK, and at f/10, I set to 0.75s at first but still couldn't show Venus nicely without very high gain. The final exposure I used was 2s, with medium gain. It's hard enough since I couldn't get good polar alignment with so limited time and space.

1932, CaK at f/10, 1s exposure, pretty high gain.

1938, CaK definitely used, exposure 1.25s, high gain.

1942, CaK used, exposure is 2s, medium gain.
Not a successful observation, and hard enough to make 2s exposure accurate at 2500mm+, also demanding on seeing and transparency, I doubt if I will try again, since it's pretty hard to get decent polar alignment in such a short time window.
Friday, June 01, 2007
20070601 Solar
SM40/BF10/DMK31AF03, seeing 5/10, transparency 8/10, very nice sky that I seldom met!

Taken on 1504: 2x barlows + 2.5x corrector with extension tube, around 4x effectively, oversampling indeed.

Taken on 1506: 2x barlows, the same QRF but at proper sampling.

This is a mosaic of 3x3 raw frames, it maximizes the resolution of Solarmax 40 theoretically.

Finally, a CaK taken on 1512.

Taken on 1504: 2x barlows + 2.5x corrector with extension tube, around 4x effectively, oversampling indeed.

Taken on 1506: 2x barlows, the same QRF but at proper sampling.

This is a mosaic of 3x3 raw frames, it maximizes the resolution of Solarmax 40 theoretically.

Finally, a CaK taken on 1512.
PST etalon experiments
The sky is better today, so I did a series of experiments:
1. 2 red filters, Borg 45ED II, 2.5x corrector, PST etalon module, a lot of extension tube, BF10, UV-IR block
-> This is a successful test, prominences are shown nicely, but surface detail is minimal, I suppose this light cone is closed to f/10 and thus, the PST etalon is happier with it
2. 2 red filters, Borg 45ED II, PST etalon module, 2.5x corrector, BF10, UV-IR block
-> This one also works, but prominence is less contrasty
3. 1 red filter, Borg 45ED II, PST etalon module, 2.5x corrector, BF10, UV-IR block
-> Too much internal reflection, didn't work well
3. 1 red filter, Ranger, 2.5x corrector, PST etalon module, one extension tube, BF10, UV-IR block
-> This does not work, many internal reflections. The red filter used is lighter in color, and so the problem is worsen...
I suppose we need something like a T-max or simply more red filters to eliminate the internal reflections! At the same time, closer to f/10 definitely helps.
Strange is that, last time we did try f/8 and it works, too. Obviously f/10 is the best.
Also with two red filters, the sun at prime focus of my Borg is just slightly warm. But with one red filter, the sun at prime focus of my Ranger is very hot.
Subscribe to:
Posts (Atom)