Not bad it seems!
Let's see how it was made, drill three holes to mount the small motor:-
Put on a toy car wheel, drive by friction:-
The solarmax was mounted via a big square hole (circular is better but also much harder to cut), to engage the motor, rotate the solarmax within its hole.
There is no sun around, so I just put it on top of a plastic case to test:-
The prototype which I made last time:
http://osastrolog.blogspot.com/2009/05/small-dc-geared-motors.html
Welcome to my astronomy blog, I dedicate myself to the simplest form of amateur astronomy which requires only portable equipment. I have two small refractors, two small binoculars, one small GOTO mount and another small equatorial mount, and a small H-alpha solar filter. Originally from a city where the people were proud of their light pollution, that is Hong Kong where I loved. Relocated to the UK since 2021.
Thursday, June 24, 2010
DIY enclosure for Lumenera LU070M
The title says it all. The first one is connected to the Peltier cooler, of course, it's not good enough to seal from all condensation, but it's good enough to have it cool down. Separate power supply socket.
Another one is just a simple box, good for day time purpose for solar imaging, to stay away from direct sun light.
Sunday, June 20, 2010
No more sun even after 3:00pm
Yesterday, I needed to go out before 2:00pm and therefore, I have no access for the sun.
Today, I can return home at around 3:00pm, but then the sun was already blocked by the nearby construction site, that tower crane. Hopefully when the building work is finished, I may be able to see the sun for a longer time? Anyhow, the seeing will still be very bad.
Around 5 years ago, I can even do planets and even some limited deep sky imaging. But then around 2-3 years ago, I was more or less limited by lunar and solar imaging. Recently, solar imaging is in trouble.
What next? Will I be forced to give up indoor astronomy altogether?
Saturday, June 19, 2010
iOptron Cube for the Night Sky
Cloud moving around tonight but that couldn't stop me from setting up the scope in front of the window. Simple compass north and level gives accurate GOTO on the moon and the saturn at the field at 24x.
I'm using the hacked side, and that quick release adapter which I've used for the scope attachment could slip. Luckily, it won't slip on normal usage, but when I called my kid to see through the eyepiece, they might push their eyes too hard on the eyepiece so that it slips.
Tracking was stable for visual observation just as expected, since it was stable enough for imaging.
So far I'm impressed by this little mount, really versatile and accurate enough for its purpose.
--
I've tried to do some planet imaging on the unofficial side, but then the adapter slips. I would rather say this is not the problem of the mount itself, and I guess if I'm using the official side with the dovetail, it should work.
Therefore, for indoor imaging purpose, this mount won't work for me since I've to use the unofficial side rather than the official dovetail saddle. As a result, I won't be able to do indoor planet imaging with this mount. And the direct implication to me is, I won't invest in another scope just for planet imaging since the unofficial side was even insufficient for the Ranger, not to say anything bigger.
Of course, I could attach another dovetail saddle to the unofficial side to solve the slipping problem, but I won't do so at the time being.
Friday, June 18, 2010
List of items that I want to get rid of...
Expected price in HKD without shipping:
- 5" diameter heat absoring glass, ask for $50
- Factory Enhanced Unistar Light: the Customization is done by Universal Astronomics, not by me, so that it can be used to support a C8 at medium power observation (up to around 100x), super portable at less than 2lb only, adapter available for 3/8" tripod. Come with an extra Japanese made GP compatible dovetail saddle. Ask for $1600 HKD, or $1400 HKD without the saddle.
- Orion 100mm ED f/9 with tube rings, ask for $3500 HKD, can be used with the above mount. Get both at $4800 HKD.
- 1.25" APM Herschel wedge with matching 1.25" B+W ND3 and polarizing filters, $1800 for the whole set, the perfect tool for serious white light solar observer.
- Lumenera LU070M 1/3" 640x480 60fps 10-bit USB 2.0 black white camera, excellent for solar imaging, HKD $2700 each, I still have two on hand.
- Shoestring Astronomy FCUSB, USB focusing controller compatible with JMI focusers, etc. Expect $500 HKD.
- Sky Atlas 2000.0
Thursday, June 17, 2010
Canon 15x50 IS
Had been using my Canon 10x30 IS for some time, I really enjoy it. It's compact but it delivers very bright image considering its 3mm exit pupil. You know, it's on-par with my good old Pentax 10x50 PCF III in terms of brightness and I can usually see more with the help of the excellent IS.
Therefore, I'm always dreaming of a more powerful model. After selling much stuff, I have some paypal balance around. To transfer it to my bank account, it has quite a bad exchange rate, so it's wise to use it. Therefore, I've ordered a Canon 15x50 IS!
Once it arrives, I shall test how it compare with my existing Canon 10x30 IS in terms of capability and portability. I shall decide which one I should keep in long run.
On paper:
1. Canon 10x30 IS - 6 degrees true field of view (60 degrees apparent field), 10x power, 630g, 3mm exit pupil
2. Canon 15x50 IS - 4.5 degrees true field of view (67.5 degrees apparent field), 15x power, 1180g, 3.3mm exit pupil
At nearly double the weight, the verdict is pending testing. Also, I wonder if the IS would still be effective enough given the heavier weight and higher power. Really longing to try it out!
--
Received a piece of junk from ebay... cracking and broken here and there, full of mould, finger print and dust... it's a very poor abused kid.
Complained and will be returned to the seller tomorrow. I hope no one will buy it again, for it's truely junk...
Need to find another one later after the refund was completed.
Friday, June 11, 2010
Software Ready...
Just installed the following on my netbook:
1. Lumenera driver for my LU070M
2. K3CCDTools again for my LU070M
3. Driver for my iOptron mount
4. ASCOM Platform, ASCOM driver for my iOptron mount
5. Cartes du Ciel
All tested to work, now ready for solar imaging as well as comet hunting when the sky allows.
--
Found the c mount to 1.25" adapter with filter thread on ebay again, $21 USD shipped, not a bad deal. I will need this one in order to shoot in white light with my Herschel wedge... since I'll need to attach those ND3 and polarizer to the camera nosepiece.
The Lumenera LU070M barrel does not have filter thread.
20100611 Sun
Muddy sky, full of moving cloud, and the cloud never stop moving. Anyway, just a record.
I've rotated the telescope in its mounting ring so that it's more like for alt-az tracking. I've also moved the ring such that it is in great balance when used with the Solarmax 40 and BF10.
--
Sales of the Orion 100ED:
A potential buyer of my Orion 100ED + Unistar Light has contacted me this morning, we shall meet tomorrow morning to test the scope out. He will bring a tripod and I will buy a couple of eyepieces for the test.
Just wish that this nice scope would impress him, and I really want this excellent scope to have a good new home! If I successfully sold this scope finally, I will stay as such. Low inventory, only the most portable.
I shall attach the Unistar Light on the Orion 100ED tonight.
Tuesday, June 08, 2010
Dual scope setup for the cube
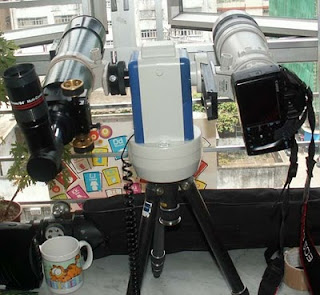
This is a "side-effect" of my recent hack, the cube can now carry two scopes at the same time, and it should allow better balance as well. As a quick test, I setup my Ranger on one side, and I setup my DSLR with a 100-400mm lens on the other side. Both are around 70mm in aperture, and the weigth is quite similar as well.
After rough balancing, I engaged the mount by tightening the black knob. Then, I align both side by adjusting the quick release plate which I've added to the black knob side. This quick release plate is so nice that you can swing around the pivot, and so it's enough for me to align both views.
Everything work as expected.
Of course, this setup is more for experiment than practical, since I won't use the cube for longer exposure. However, this should be nice for eclipse chasing! You can observe on one side and take snapshots on the other side.
I love this little cube even more!
Sunday, June 06, 2010
20100606 Sun - Cube Refined
I've optimized the Cube based setup, again, picture tells the story better. I bought a small quick release plate, in which the plate can be rotated relative to the base. This plate is far lighter than the 410 head for such, and it's far lower profile and thus, the whole setup balance very nicely!
So, the scope could be attached easily and it's very stable.
Close up shot of the joint:
And the sky is better today, so the image quality tells. After seeing this image, I know that alt-az tracking of the Cube is great enough!
No need to look back. This setup is just right for me, it's lighter, more portable and stable enough for indoor solar imaging. With the hacking on the black side, the scope can point out of the window easily, I don't even need that offset plate which I've to used during the summer for indoor imaging with my LXD55.
--
Originally, I planned to buy a ball head for the black side. I checked that there're some good candidates from ebay, and so I went out to the local shops to compare the price. To my surprise, the ebay price is cheaper and it even includes shipping!
When I'm about to give up, I saw that quick release plate, and I think it should even work better since it's lighter and less complex. Therefore, I shall live with this plate at the time being, and I shall see if rotation is enough to align both sides or not. Such an alignment is useful when I use both ends for observation and imaging.
--
I will be passing my LXD55 to a local friend tonight, now knowing that the Cube will work for me, I feel more relax for the transaction.
No need to look back now!
Now, I'm saying goodbye to any heavier equipment formally. :-)
My heaviest scope is just 7lb (Orion 100ED) but it could be held with a 4lb mount (Unistar Light + Gitzo G106)!
Saturday, June 05, 2010
First Light of iOptron Cube
This is the first time that my Cube is pointing to the sky.
And I've mounted the scope on the other side of the official dovetail via the hack which I've just done last night. And the devil is in the detail, the black knob cannot be engaged since the newly added mounting screw has a head which is too big! There, I've looked around my home to find a suitable "washer" to offset that, here I found a very nice plastic ring.
A picture tells a thousand words. Since my small ball head is just too small to mount my Ranger, I've mounted my Manfrotto 410 head there. It is strong but it's heavy as well. Therefore, I've to extend my tripod so that the whole thing will not tip over.
It works perfectly. Slewing is smooth and the scope was extended farther out, it reaches a lot of sky outside! However, it's a little bit late and so the sun was sinking low close to the newly constructed building, bad... the seeing becomes very poor therefore. Tracking is smooth and the sun keeps in its place virtually during I take my snapshots. Focusing will induce vibration but I'm using a NGF-CM and thus it's not a problem at all.
Since this is not the official side, I believe it could be better on the official side? Anyway, here's the result:
20100605 1518 (GMT+8), this does not come out as good as before, but I guess it's more like a problem of the sky condition rather than the mount or the tracking performance. Cloud keep moving around and seeing was extremely bad.
Therefore, I've to try more to know.
The 410 head is close the 3lb alone, plus the Ranger, the solarmax and the camera, the whole thing is more than 7lb but the performance of the Cube is good enough, I'd say... it's an excellent portable and economical mount indeed.
Friday, June 04, 2010
Solving the indoor usage problem of the iOptron Cube
It's not a solution but it's a workaround. What I'm trying to do is to put the scope on the other side! Some local folks have done that and I tried to do it as well, what they were trying to do is to put another scope or camera on the other side of the cub, but in my case, I want the telescope to reside on the other side since it will enable me to reach farther out!
Here's what I've done. First of all, drift a hole on the central of that black disc on the other side of the mount, that is, the engagement knob. It's easy to drill at the center with good accuracy, since it's recessed in the middle. The hole is not very big, around 12mm only and so you will need to decide which mounting screw is to be used. For me, I've chosen 1/4" which is rather like a standard for ball head. While 3/8" would be even better but I found that hole was not quite big enough, remember the screw head has to be small enough as well.
So, I placed a small 1/4" screw inside, it can sit fully within the hole, without hindering the knob to engage the mount.
Put on a ball head... this one is too small and it cannot hold any telescope, not even my now sold Borg 45ED II, so I will need to buy a bigger one soon.
To put the whole thing back to the Cube.
This side of the mount should have less loading, but for my light weighted Ranger at 3.5lb only , it's going to work.
The good thing is that, now I can put my Ranger to the other side of the mount, and it also reaches out more since the ball head is taller than the dovetail saddle! And a great side effect is that, the little cube can hold two telescopes (or one telescope, one camera) now, and it should balance better.
Quite elegant and easy to do.
Technical issue about the iOptron Cube
It's cloudy outside but the sun is strong enough to penetrate part of the cloud, so I pulled out my Cube for testing.
I found that if I put my cube in its "park position", when I ask it to slew to the Sun, the scope will go to the right side of the mount.
And since I'm trying to do indoor imaging through my south facing window, so if the mount can put the telescope on its left side, it should be far better for me. Is there any way that I can instruct the mount to point via the other side?
I've tried to slew the scope to the other side of the mount, but the software is "smart" enough to say that the scope is now pointing below the horizon...
Any idea or input would be highly appreciated.
Wednesday, June 02, 2010
Sanyo Eneloop
These are the best AA rechargeables that you can buy in the market. They hold charges surprisingly well, and so despite they're rated only at 2000mmAh, they last much longer than typical rechargeables.
I bought the first pack for my digital camera, but then I bought some more packs for other stuff like my Canon 10x30 IS, and later I bought some more to power my Firewire hubs which drives my DMK 31AF03 in the field. Now, I've sold my DMK and where shall I use these batteries? At the same time, my digital camera has less usage after I got my DSLR.
Yes, it's my newly acquired iOptron Cube! A local friend has tested it on rechargeables and they can last for 6 hours, and therefore, it's more than enough for my observation habbit and that makes it super portable as well, no more SLA battery.
Today I counted them all, and I've four packs of Eneloop at home. Two packs for my iOptron Cube, half pack for my Canon 10x30 IS, and one pack for my DC, and there're still two left for other purpose, like the toys of my kids.
Equipment changes tonight
Will do two things tonight:
1. Pass the 1.25" focuser to a friend, I bought that focuser in the hope to use some existing objective lenses, but it never realized. It's time to give it to someone else, I sold it at 40% of the original price despite it's virtually new. Despite it's made of plastic, it's better quality than many focusers these days. Attention was paid to the detail like a very well blacked interior, internal baffles, thicker plastic on the place where the set-screw is located, very nice padding to reduce any slack space between the draw tube and the focuser body.
2. Fetch a polarscope for my TG-SP II. This is a charity item as donated by a really good man from the local astronomical society, he passed away recently and his equipments were sold to set up a charity fund. I should have offered far cheaper price for this item but I did not. After getting this polarscope, my TG-SP II is now completed with the original wedge and the original polarscope.
I shall sell my DIY polarscope and mounting plate afterward.
At the same time, I've found a new owner for my G1415 and LXD55. I shall pass it to the new owner on this Sunday. I will continue to consolidate my astronomical stuff, to reduce my inventory to an absolute minimal, to keep only all those portable equipments, and only those I can use more often than those which were sitting idle all the time.
Subscribe to:
Posts (Atom)